
How To Understand Birth Mechanism
In one of my first lectures on anatomy and physiology, I dropped the doll and pelvis set we were handing round.
As we were in a seminar room with a pitched floor, the doll bounced down the steps for quite a long way with a clonk-clonk-clonk noise before another student caught it. Not a great omen.
How To Understand Birth Mechanism
I also struggled quite a bit with the birth mechanism side of things as I’m not a very visual person. Cycling has been my main form of transport for about ten years and my partner still laughs at me trying to lock my bike to stuff because I can never get the shapes to line up.
But even with my dire relationship with spatial awareness, I still managed to learn everything I needed to as a student midwife.
In this post I wanted to go through the most typical mechanism of birth as maybe like me you struggle a bit and maybe also like me you find it utterly fascinating.
Having a good knowledge of the mechanism of birth will help you as a midwife visualising what’s going on when a woman’s in labour and helping her optimise positions.
It’s essential knowledge if you want to be a successful midwife promoting physiological birth.
There are many ways for babies to be born, they do all kinds of interesting things in the diameters they have available as they journey through the pevis and birth canal, but knowing this route that's most typical is a great base for learning all the others.
First watch this great summary video which simply explains the passage of the baby through the pelvis:
Now we can fill in a few more details.
The Mechanism Of Typical Birth:
Descent: The baby’s head enters the pelvis in a traverse position. This means the baby’s face is either facing towards the left or right of Mum. As the video above says, this is because the widest part of the baby’s skull is fitting into the widest diameter of the pelvic outlet.
Flexion: As descent happens, we hope the baby will tuck his or her chin in, touching the chest, as this makes for the very smallest diameter of the baby’s head coming through the pelvis.
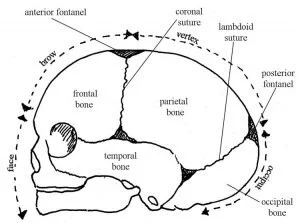
Internal Rotation of the Head: With contractions and pushing, the baby’s head reaches the pelvic floor. The pelvic floor is a sort of cradle of muscles, ligaments and fascia which is between the pelvic cavity and the perineal area below.
When the baby’s head gets to the pelvic floor, it will turn. Because the smallest bit is the vertex shown in the image below, this is what will fit into place and emerge from Mum first.
Crowning: For a little while there is usually some ‘two steps forward, one step back’ type pushing where the presenting part progresses and recedes. Eventually, the occiput will come under the pubic arch and the head will crown and not recede anymore.
Extension: The fetal forehead, face and chin ‘sweep’ the perineum.
Restitution: Now the baby’s head is born it will turn either towards Mum’s left or right thigh, depending on the position of the shoulders (the baby’s head will right itself with the shoulders).
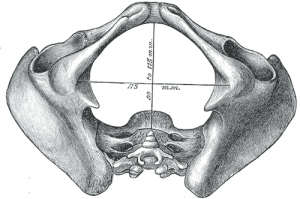
External Rotation: Now the shoulders will rotate internally – the largest diameter of the pelvic outlet is from top to bottom in the image below, or otherwise known as the ‘anterior-posterior ‘(AP) diameter. This is where the baby will position their shoulders.
Lateral Flexion: The head will restitute back into alignment with the shoulders. The uppermost shoulder is delivered (known as the anterior shoulder) under the pubic arch, followed by the posterior shoulder and the baby is fully born!
Of course, you’ll need to be able to describe all the different diameters of the fetal skull and pelvis, the names of bones, sutures and fontanelles, and other details for exams as a student midwife.
But if you know the physiology inside and out (haha) you don’t actually need to know the names of all the different bones and diameters to practice well.
Though it does help when communicating with medical staff and it can be fun to have that lingo at your fingertips!
Do remember Mums probably aren’t going to know technical anatomy and physiology details so it’s always good to be able explain things in clear terms, without the jargon.
Ina May Gaskin in Spiritual Midwifery is particularly skilled in explaining things in a down to earth way.
Drawing lots of diagrams, using revision cards and practising with a doll and pelvis over and over will make things much easier to learn.
In fact, there's good evidence that combining creativity with learning makes you remember things more effectively.
So my questions for you today are…
1. Was this post helpful in understanding the basic mechanism of birth?
2. What’s a creative way of committing this to memory, what's one thing that could make all the difference to your learning?
3. If you’re a lecturer or mentor, how do you help your students learn the mechanism of birth?
Leave me a comment letting me know.
I hope you’re having a great week and not melting! Thanks for spending your valuable time reading about birth and it's an honour you're here on Midwife Diaries.
Ellie xx